
How to Make a YouTube Thumbnail: A Step-by-Step Guide
· 11 min read
To make a YouTube thumbnail, decide the one idea it should communicate, sketch a simple layout around a single focal point, build it at 16:9, check it at small sizes, export it as a JPG or PNG, and upload it in YouTube Studio. You can build it in a design tool, in a photo editor, or with an AI image generator. The steps below work with any of them.
Here is the kind of result we're aiming for, and why it works:
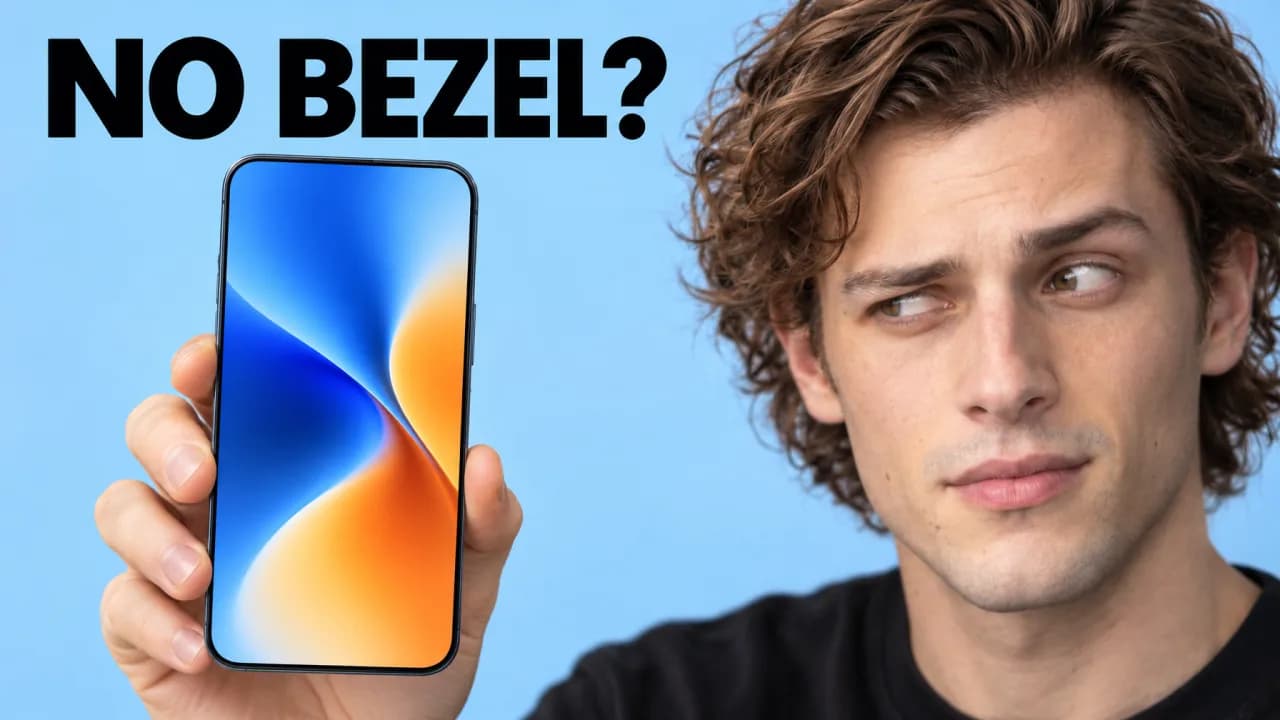 A good thumbnail: one idea, one focal point, two words. Generated with Ctrbuddy; the phone is fictional.
| Element | Why it works |
|---|---|
| Face on the right third, partly cropped, one raised eyebrow | The emotion (doubt) is readable even when the thumbnail is tiny, and it asks the viewer a question. |
| One phone on the left, sharp and large | There is a single object to look at. |
| "NO BEZEL?" in two huge words | It adds a question the title doesn't need to answer. Black on light blue gives maximum contrast. |
| Plain pastel background | The subject separates cleanly. Nothing competes with it. |
| Nothing important in the bottom-right corner | Only a shoulder sits there, so YouTube's video-length overlay won't cover anything that matters. |
1. Decide the one idea
Before opening any tool, finish this sentence: "Someone scrolling past should instantly understand that this video is about ___." The answer is usually a result, a contrast, an emotion or an object. If you have two or three answers, pick one. A thumbnail with three ideas communicates none of them.
Write the title at the same time. The thumbnail and title work as one message, so the thumbnail should show something the title doesn't say.
2. Plan the layout on paper
A rough sketch takes a minute and saves an hour of nudging layers. Draw a 16:9 rectangle and place three things:
- The focal point: a face, an object, or a before/after, large enough to fill roughly a third to a half of the frame.
- The text, if any: three words or fewer, placed in empty space rather than over the subject.
- Empty space: deliberately left clear. Empty space is what makes the focal point readable.
Keep the bottom-right corner clear, because YouTube overlays the video length there.
3. Get your source material
Most good thumbnails start with one strong image:
- A face with a clear expression. Photograph yourself against a plain background in soft, even light, and exaggerate the emotion a little more than feels natural. Small expressions disappear at small sizes.
- A hero object. Photograph the product, prop or screen you're showing, close up and in focus.
- A frame from the video. This works if a single frame already tells the story, but frames are often busy and dark, so crop in tightly.
4. Build it at 16:9
Create a 16:9 canvas at 1280 × 720 px. That is the most common YouTube thumbnail size: sharp on every surface and a small file. Larger 16:9 sizes such as 1920 × 1080 work too.
Then build in this order:
- Background first. Use a simple color, gradient or blurred photo that contrasts with your subject.
- Subject next. Cut it out and place it where your sketch says. Add a thin outline or soft glow if it blends into the background.
- Text last. Use a heavy, simple font in a color that contrasts strongly with the background, and keep it away from the edges.
Any tool that exports a 16:9 image will do: a design tool, a photo editor, even slides. The tool matters much less than the order: background, subject, text.
5. Check it small, and in greyscale
Most impressions are small: a phone feed, a suggested-video sidebar, a search result. Shrink the thumbnail to roughly 150 px wide and look at it from arm's length.
- Can you still tell what it shows?
- Can you read the text?
- Convert it to greyscale. Does the subject still stand out from the background?
If the answer to any of these is no, simplify. Remove an element rather than shrinking everything.
What a failing thumbnail looks like
This is the same topic, made the way most first drafts go wrong:
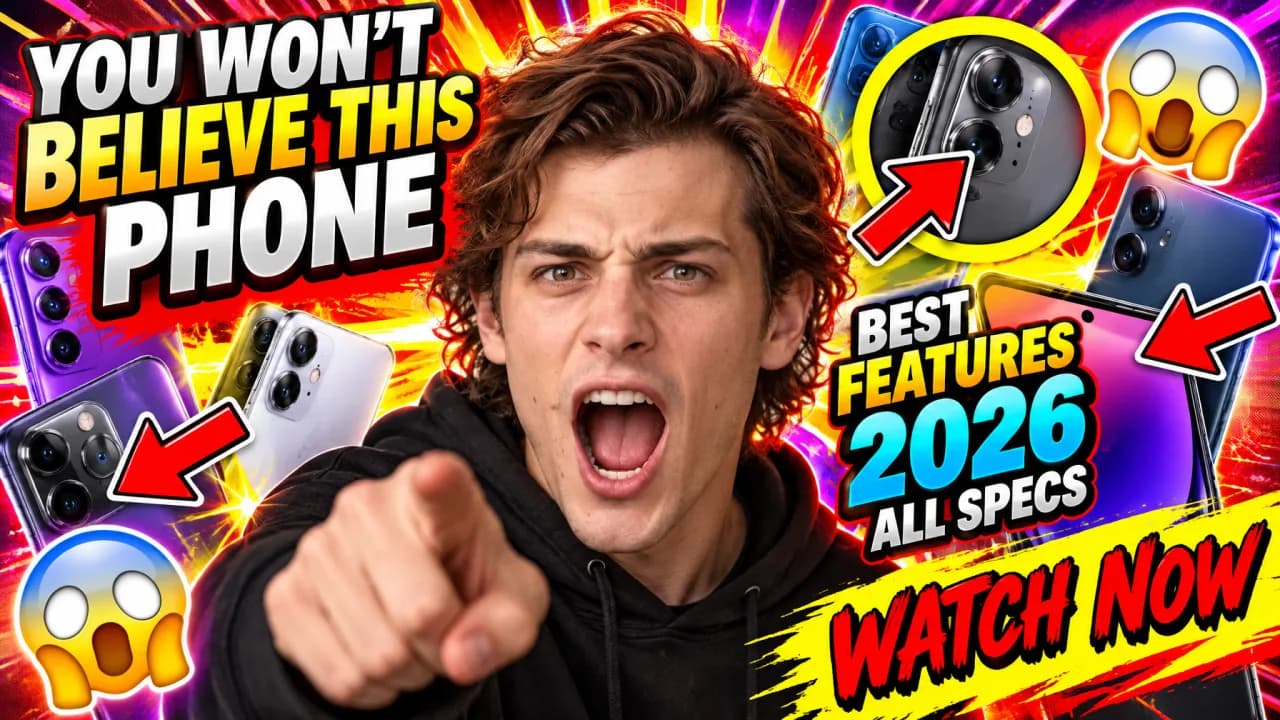 A cluttered thumbnail: every element competes, so none of them wins. Generated with Ctrbuddy as a deliberate bad example.
Run it through the 150 px test and almost nothing survives. Here is what's wrong and how to fix each issue:
| Problem | Fix |
|---|---|
| Three blocks of text, twelve words in total | Keep one phrase of three words or fewer. |
| Arrows, a circle and emoji | Remove them. Let the subject's gaze and position point where you want. |
| Several phones at different angles | Pick one hero object and make it large. |
| A saturated starburst background | Use a solid or softly blurred background. |
| Text running into the bottom-right corner | Keep that corner empty for the video-length overlay. |
| A shouting face and a pointing hand | Choose one readable emotion. |
| A loud promise ("You won't believe this phone") | Promise only what the video delivers. |
6. Export at the right YouTube thumbnail size
These are the specs from YouTube's help page for custom thumbnails, plus the size most creators work at:
| Spec | What to use |
|---|---|
| Size | 1280 × 720 px is the common choice. YouTube lists 3840 × 2160 px as the resolution. |
| Minimum width | 640 px |
| Aspect ratio | 16:9 |
| Format | JPG for photos and faces, PNG for crisp graphics and text |
| File size | Up to 50 MB from a computer, 2 MB from the mobile app |
| For A/B tests | At least 1280 × 720. If any thumbnail in a test is smaller, YouTube downscales all of them to 480p. |
If you upload from your phone, a large PNG may go over the 2 MB limit. Export it as a high-quality JPG instead. For Shorts and podcast sizes, and the smaller copies YouTube actually shows viewers, see our YouTube thumbnail size guide.
7. Add the thumbnail to your video in YouTube Studio
- Open YouTube Studio and go to Content.
- Open the video and find the Thumbnail section.
- Choose Upload file and pick your image.
- Save.
The same steps change the thumbnail on a video you've already published. Custom thumbnails require a verified account. If you can't see the upload option, verify your account first.
Once the video has collected impressions, you can test alternatives against each other. See how to A/B test YouTube thumbnails.
Score your thumbnail before you upload
Give one point for each "yes". This is our own rule of thumb, not a YouTube metric. If you score under 6, simplify before you publish.
| # | Question | Point |
|---|---|---|
| 1 | Can I describe the single idea in one sentence? | 1 |
| 2 | Is there exactly one focal point? | 1 |
| 3 | Is the text three words or fewer? | 1 |
| 4 | Is the text readable at 150 px wide? | 1 |
| 5 | Does the subject stand out in greyscale? | 1 |
| 6 | Is the bottom-right corner clear? | 1 |
| 7 | Does the thumbnail show something the title doesn't say? | 1 |
| 8 | Does the video actually deliver on it? | 1 |
Making a thumbnail with AI
AI image generators can speed up steps 3 and 4: instead of photographing a prop or building a background, you describe the scene and get a draft. A few habits make the results better:
- Describe the scene in full sentences. Say who or what is in the frame, the expression, the lighting, the background color and where the empty space should be. Lists of keywords work much worse.
- Put the text in quotes and keep it short. Image models render a few large words much more reliably than a sentence.
- Check the result like any other thumbnail. Small, greyscale, one focal point. AI output can look polished and still fail all three checks.
- Look closely at faces, hands and text. These are where generated images most often go wrong.
- Only use faces you have the right to use. Use your own, or someone who has agreed. Don't generate thumbnails with a real person's likeness without their permission.
A prompt template you can copy
Fill in the brackets. Every part of the template maps to a decision from steps 1 and 2.
A clean [niche] YouTube thumbnail. On the [right/left] [third/half] of the frame, [a close-up of the face with a specific expression, or the hero object]. On the [other side], [the second element, if any], tack-sharp. Background: [a solid color or simple setting], slightly out of focus. In the empty [position], the [number] words "[TEXT]" in huge bold [color] sans-serif, perfectly legible. Leave the bottom-right corner empty. [Lighting], [lens and depth of field], photorealistic, 16:9. No logos, no watermark, no extra text.
The prompt behind the example above
This is the prompt we used for the good example at the top of this page:
A clean tech-review YouTube thumbnail. On the right third of the frame, a tight, partially cropped close-up of the persona's face with one raised eyebrow and a calm, skeptical side-eye glance toward the left. On the left half, a generic unbranded smartphone with a very thin bezel held up close to the camera by a hand, tack-sharp, its screen on and showing a vivid abstract blue and orange gradient wallpaper with no icons, logos or text. Background is a solid soft pastel light-blue studio backdrop, slightly out of focus. In the empty upper-left negative space above the phone, the two words "NO BEZEL?" in huge bold black sans-serif, perfectly legible. The bottom-right corner is left empty. Bright even natural studio lighting, true skin tones, 85mm f/1.4 shallow depth of field, photorealistic, 16:9. No logos, no watermark, no arrows, no emoji, no other text.
How we made the examples
Both example thumbnails were generated with Ctrbuddy. For the good example we used a saved Channel DNA style for clean tech-review thumbnails and a saved persona for the face (a generic, stock-style face, not a real creator). Channel DNA carries the style rules, such as one hero object, a plain pastel background and one to three words of text, so you don't repeat them in every prompt. The cluttered example was generated without a style, using a prompt that deliberately asks for everything we advise against. Each image is the first result for its prompt, not picked from a batch. The phone is fictional and carries no brand marks.
If you want to try this workflow, Ctrbuddy lets you describe the video, keep your own face as a persona, edit a result or use another thumbnail as a reference, and score a draft before you publish it. It also works from Claude through the Ctrbuddy MCP server. It is one way to do steps 3 and 4. The checks in steps 1, 2 and 5 are still your job.
Frequently asked questions
What size should a YouTube thumbnail be?
Use 1280 × 720 pixels in a 16:9 ratio, saved as a JPG or PNG. YouTube's help page lists 3840 × 2160 as the resolution and 640 pixels as the minimum width, so any larger 16:9 size works too. Keep the file under 2 MB if you upload from the mobile app.
How do I change the thumbnail on a video I already published?
Open YouTube Studio, go to Content, open the video, choose Upload file under Thumbnail, and save. You can swap it as often as you like. If the video is running an A/B test of thumbnails, though, changing the thumbnail stops the test and you'll have to restart it.
Why can't I upload a custom thumbnail?
Usually because your account isn't verified. YouTube only allows custom thumbnails on verified accounts, and without verification the Upload file option doesn't appear. Verify the account, reload YouTube Studio, and the option should show up under Thumbnail in the video's details.
Can I make a YouTube thumbnail for free?
Yes. Any free design tool, photo editor or slide app that exports a 16:9 JPG or PNG at 1280 × 720 will do. Paid tools save time on cutouts and templates, but none of them fix a thumbnail without a clear idea. The one-idea, one-focal-point and small-size checks cost nothing.
What makes a good YouTube thumbnail?
One idea, one focal point and three words of text or fewer, with enough contrast that it still reads at about 150 pixels wide. It shows something the title doesn't say and promises only what the video delivers. Run it through the eight-question score on this page before you upload.
Can I make a YouTube thumbnail on my phone?
Yes. Shoot or pick the image, build it in any phone photo editor on a 16:9 canvas, and export a JPG. Keep it under 2 MB, because that's YouTube's limit for thumbnails uploaded from mobile. Then check it at small size, the same way you would on a computer.